Why Tokyo's Rail Network Feels Overwhelming — And Why It Isn't
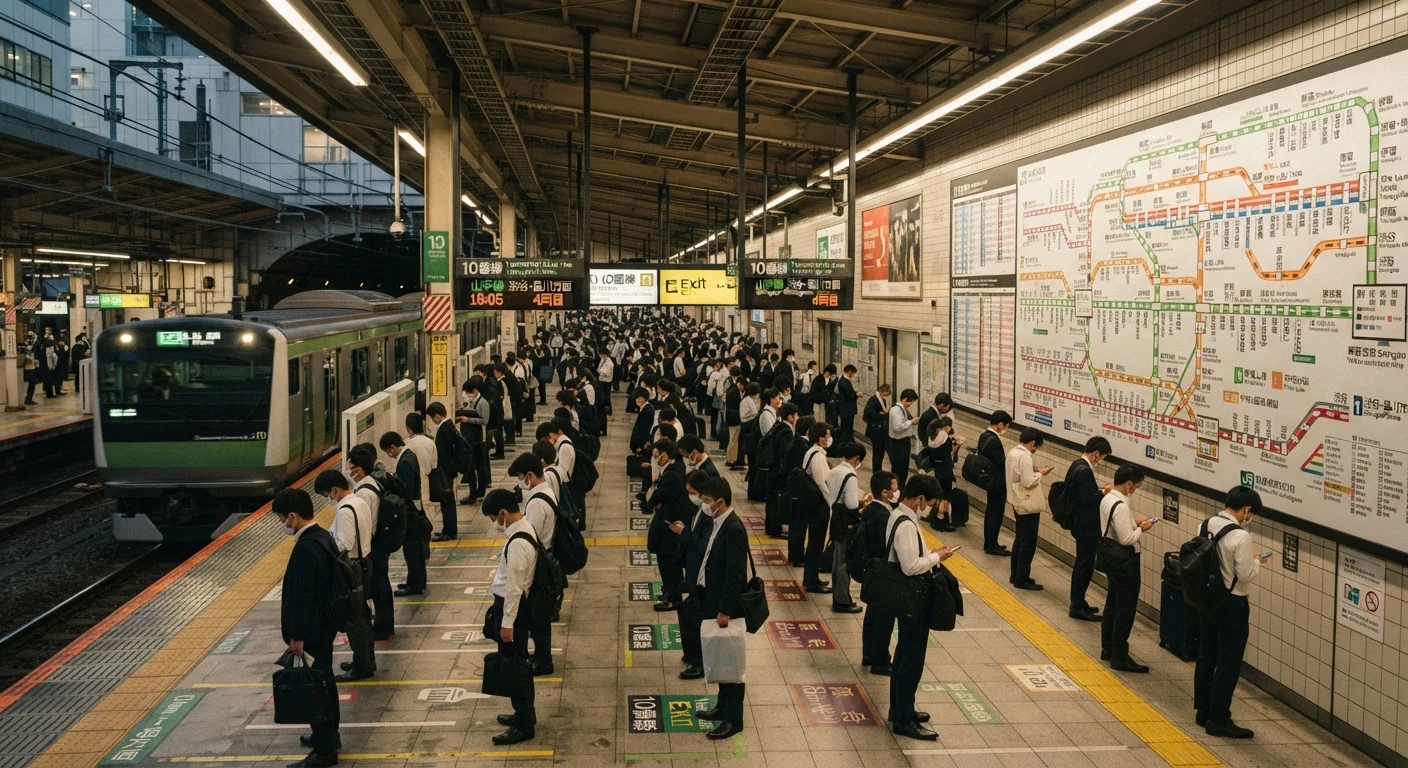
At first glance, a Tokyo rail map resembles a plate of spaghetti. With over 280 stations on the Tokyo Metro alone, plus JR lines and Toei routes layered on top, the sheer density can unsettle even experienced travelers. But the network follows a consistent internal logic: every line has a color, every station has a number, and English translations appear on nearly every sign, map, and automated announcement.
The key insight for newcomers is that you rarely need to understand the whole system — only the handful of lines relevant to your itinerary. Most visitors to central Tokyo rely on four or five lines at most: the Yamanote Loop (JR), the Ginza Line (Metro), the Marunouchi Line (Metro), and perhaps one or two others depending on their neighborhood base.
For broader context on navigating unfamiliar transit systems from scratch, our end-to-end public transport walkthrough covers the universal stages of a transit journey — from hotel to exit gate — that apply in Tokyo just as much as anywhere else.
What you will need
The Three Operators You Need to Know
Understanding which company runs which line matters because fares are calculated separately per operator. Transferring between a Tokyo Metro line and a Toei line, for instance, means paying two distinct fares rather than a single through-fare — even if you never exit the station complex.
The Yamanote Line (JR, color: green loop) is the backbone of tourist Tokyo, circling major hubs including Shinjuku, Shibuya, Harajuku, Akihabara, Ueno, and Tokyo Station in about an hour. Think of it as your orienting framework. Most Metro and Toei lines intersect with the Yamanote at one or more points, making transfers straightforward.
The Tokyo Metro operates nine lines that cut across and beneath the city center. For newcomers, the Ginza Line (orange, G) and Hibiya Line (gray, H) are the most intuitive — they run roughly east-west and connect major tourist districts with minimal transfers.
The Toei Subway covers areas that Metro lines don't always reach well, including Asakusa (Asakusa Line, A) and the Shinjuku-to-Shiodome corridor (Oedo Line, E). Toei fares tend to run slightly higher than Metro fares for comparable distances.
Suica or Pasmo IC Card
Acts as a reloadable fare card accepted across JR, Tokyo Metro, Toei Subway, and most buses in the greater Tokyo area.
Google Maps (Tokyo transit mode)
Provides step-by-step routing with real-time fare estimates, transfer instructions, and platform numbers.
Tokyo Metro Official App
Offers detailed line maps, English station information, and service disruption alerts directly from the operator.
Printed pocket rail map
A paper backup for navigating when your phone battery is low or data connectivity is unavailable underground.
If you are arriving from Narita or Haneda airport, your transit journey actually begins before you set foot on a Tokyo city line. Our airport transfers guide explains the options — including the Narita Express and the Keikyu Airport Line — so you arrive at your hotel without confusion.
On the Ground: Boards, Gates, and Exits
Tokyo stations are engineered for volume, and that engineering shows in the signage. Color-coded overhead banners mark platforms; arrows direct passengers toward gates, exits, and connecting lines. When you first arrive at a major station, take thirty seconds to orient yourself at the nearest map board before moving — the mental map you build in that moment will save time later.
Use Station Numbers, Not Just Names
Every station in Tokyo's network has an alphanumeric code — for example, Shinjuku on the Marunouchi Line is M-08. Referring to these codes removes ambiguity when a station serves multiple lines with slightly different romanized spellings, and makes it much easier to count stops until your destination.
One common point of confusion is the distinction between a transfer and an exit. A transfer (乗り換え, norikae) means switching to another line within the fare gate boundary — your card is not tapped again and you do not pay an additional entry fee. An exit (出口, deguchi) means leaving the paid zone entirely. If you accidentally exit and need to re-enter for a transfer, you will be charged a new entry fare.
IC Cards May Have Temporary Purchase Restrictions
Due to semiconductor shortages, physical Suica and Pasmo cards have at times been unavailable to tourists at certain kiosks. Before your trip, check whether a mobile Suica (available via Apple Wallet or compatible Android devices) is a viable alternative for your phone. Always verify current availability with the operator's official website closer to your travel date.
For a comparative look at how another major city's subway system works, our London Tube guide for outsiders highlights both the similarities and meaningful differences between Tokyo-style and European-style metro systems.
Understand the Three Operators
Tokyo's rail network is run by three distinct operators, each with its own fare structure and ticketing system:
- JR East — operates the iconic Yamanote Line loop and several key intercity and suburban lines. Fares are distance-based.
- Tokyo Metro — runs nine color-coded subway lines covering central Tokyo, including the Ginza (G), Hibiya (H), and Marunouchi (M) lines.
- Toei Subway — the Tokyo Metropolitan Government's four subway lines, including the Oedo (E) and Asakusa (A) lines. Toei fares are separate from Tokyo Metro fares.
Transfers between operators are seamless with an IC card but can mean paying two separate fares, so plan routes that minimize operator switches when possible.
Get and Load Your IC Card
Purchase a Suica or Pasmo card at any major JR or Metro station. Look for the green ticket machines marked Suica or the blue machines marked Pasmo. Select English on the touchscreen, choose New Card, and load at least ¥2,000 — this covers the ¥500 deposit and gives you ¥1,500 to spend on fares.
To reload (called charge), insert your card into any ticket machine and select the charge amount. IC cards can also be topped up at convenience stores such as 7-Eleven and FamilyMart.
Plan Your Route Before You Board
Open Google Maps, enter your destination, and select the transit option. The app will show you the line name, color, direction, and the number of stops — as well as any transfers needed. Note the terminal station name for the direction you are traveling; station platform signs display the terminal, not your specific stop.
Cross-reference the station number (e.g., Y-24 for Shibuya on the Fukutoshin Line) with physical signage once inside the station to confirm you are on the correct platform.
Enter Through the Fare Gates
Locate the fare gate area — marked with blue or orange sensor panels. Hold your IC card flat against the circular sensor on top of the gate; do not swipe it. The gate will open within a fraction of a second and a small screen will show your remaining balance. Walk through promptly; gates close quickly.
If you see a red light and the gate remains closed, your balance is too low. Step aside and use the Fare Adjustment Machine (精算機) before attempting to enter again.
Board the Correct Train and Exit at the Right Gate
On the platform, follow the colored line indicators on the floor to the correct boarding queue. Trains display the terminal station on the front and sides — confirm it matches the direction you noted during planning. Once aboard, overhead displays and automated announcements in English call out upcoming stops.
When you arrive, follow signs for your exit number rather than just walking to the nearest gate. In large stations like Shinjuku or Tokyo, different exit numbers lead to entirely different street-level locations, sometimes several blocks apart. Check your destination's recommended exit number in Google Maps before leaving the train.
For deeper background on what to expect during your first days in Japan — including cultural norms around train etiquette such as quiet carriages, priority seating, and no eating on local trains — see our Japan first-timer's guide.
Don't Exit the Fare Gates Without Sufficient Balance
If your IC card balance drops below the fare required to exit, the gate will not open and you will need to use a Fare Adjustment Machine (精算機) located near the exit. Keep at least ¥500 on your card at all times to avoid delays during busy periods.